


What can you do with a rainy day? Well, for starters, Kib and I had to move our run indoors to the rec center in town. Thankfully it was not as drab and drear as we had feared. Equally thankfully, Raegen did not get sick from "round and round we go". It was a genuine concern we had, but surprisingly he was the best behaved he's ever been during a run. Perhaps it was the constant passing of people as we ran in circles. ?? So, that took 30 minutes, now what?
Onto another passion I have, sewing. What a perfect day to start a sewing project. I've decided to document it on my blog in the hopes that it will motivate me to finish it soon! As I was gathering my supplies I thought back to my teaching days and how I could have improved some things. If I ever teach higher ed again, I will certainly have a blog that is full of pics, tutorials, and loads of info for my students! So here, fellow peers, Sewing 101:
I chose this dress to start with (out of the six I purchased on Monday) because it is the most appealing and I fear, the hardest! What I enjoy most about clothing construction is you don't always have to follow the rules. Many times you can mix and match and make your own design. I have chosen to combine dress A and dress F. I prefer the bodice of dress A and the ruching of the waist on dress F.

First things first! Find your size! It's always a good idea to have someone else take your measurements (more accurate) BEFORE you purchase your pattern. I made the cardinal mistake and did not take my measurements, but felt safe with buying a pattern sized 4-12. I assumed I would fall in the 4-6 pattern size. A quick note, most sewing is trial and error. The goal is to be smart with your trial and you will have no error! To be accurate, cut the pattern at the largest size and place it next to your body. Keep in mind the finished product will have a 5/8" seam allowance. As I held the pattern up for judgement, I soon realized I would not need a 4 or a 6, but rather a size 12! And I'm not even sure I will be able to put in 5/8" seams! According to the chart below (pattern envelope back), a size 12 pattern should fit a 26 1/2" waist. I have not measured my waist, but I think you and I both know it "ain't a 26!" ha!

The next step is to identify your pattern pieces. Keep in mind most patterns may include up to 15 pieces or more. Not every piece in the pattern envelope is used for each garment...figure out what pieces you need for the garment you have chosen to construct. I have circled mine in pencil.

Now you have to locate the pattern pieces on the tissue paper. When you cut the pieces out, DO NOT cut on the cutting line....that line will be used later, not now! :) Instead be generous as you cut your pieces, leaving approx. 1/2" allowance.

Now for another important step, and one that is often not taken... It is wise to use a warm DRY iron to press out the wrinkles on the tissue. Be careful to not burn the pattern piece and do not use steam. A low, dry setting works best. A pattern piece with no wrinkles will lay flat against the fabric and is easier to cut.

It's always a good idea to read the "General Instructions" and other info included on the pattern guide sheet. Another important tool is the "Cutting Layout". It is your map to placing the pattern pieces on fabric. Pay close attention to whether a pattern should be placed printed side up, down, on the fold, cut two, etc. Also note whether fabric should be a double or single layer, with or without nap, right sides together, etc.


Locate a large flat area to lay out your fabric. My kitchen floor works best for me...a hard surface is ideal because your fabric will lay flat. If you are an experienced sewer you may want to lay the pattern pieces differently than suggested in order to conserve fabric. If you are a first timer, stick to the cutting layout! :) It is best to lay your largest piece first, followed by the smaller ones.

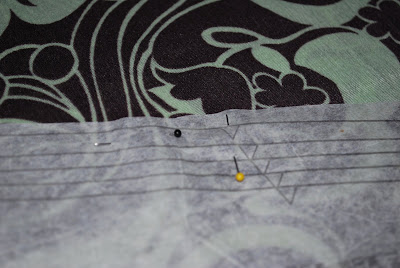
The most important symbol to locate on the pattern piece is the grainline. It will be the first place you pin your pattern to the fabric.


The grain line should be parallel to the selvage. Use a tape measure to ensure the distance from grain line to selvage is consistent for the length of the grain line. You definitely want to cut your fabric ON GRAIN! Otherwise, your garment will twist and not fit correctly.


Notches are also a very important symbol. I prefer to cut notches OUT rather than IN. I usually instruct my students to draw their notches OUT (creating a diamond shape), but in this case I have placed a straight pin in its place to guide me to cut around it. There is always a chance a seam will have to be taken out a bit, using 1/2" or 1/4" instead of 5/8". If you have cut the notches IN, you will not have that option. Also, place straight pins parallel to the cutting line so that you can cut easily and not have to pull pins out of the way (with the exception of pins that are placed at notches!) as you cut the pattern.

A great tool for cutting pattern pieces is a rotary blade and mat. I wish I could claim this great idea as my own, but I stole it from Stacy. :) This method will cut your cut time in half!! At this point it is okay to cut ON the cutting line...remember to cut the notches OUT.

To be continued...

To be continued...


1 comments:
You're a very good teacher - I've learned a few sewing tips from you already:
Cut notches out, not in
Place a pin to remind you to cut them out
And the rotary cutter really sounds much easier than scissors.
Thank you teacher Robin! Maybe when my house is in order I will do some sewing :-)
Post a Comment